Sunday, December 26, 2010

Welcome Baby

Welcome to another Sentimental Sundays challenge! I hope everyone had a lovely Christmas. Usually our Christmasses here in Brisbane are sweltering hot, but this year it wasn't too bad, apparently due to wind direction or something. Thank goodness! I hate the heat :(

Now on with the challenge!

This week's theme is Baby + a sentiment.


Welcome Baby


I opened the Framed Circle Swirls shape from Raindrop Echo Designs in Paint Shop Pro and coloured it to match the ruffled (ruched?) lace. I created the sentiment using the same program, layered it onto the frame and printed the image onto white Canson textured card. I don't have a die matching this shape (I plan on rectifying this very soon) so I cut it by hand.

I used tacky glue for the lace it was so thick it kept popping off. Nothing's going to shift it now though! I stuck the frame on top of it using foam tape above and below the lace.

So that's it from me, but you can see what the rest of the Sentimental Sundays team have created this week at the Sentimental Sundays challenge blog. You have until next Sunday to submit your entry if you decide to play along, and the random winner will receive four individual sets of digital sentiments from Raindrop Echo Designs Whimsy Stamps Digital Collection, and a custom watermark from the Custom Designs at Whimsy Stamps!

Size of card: C6 (A5 folded)

Supplies:

Card/paper - Canson textured cardstock (white)
Stamp - Framed Circle Swirls from Whimsy Stamps
Ink - printer
Extra - ruffled lace

Tools - Carl rotary trimmer, Pixma printer, scissors, tacky glue, Helmar glue runner, foam tape

Sunday, December 19, 2010

A short break, and Merry Christmas!

There won't be a Sentimental Sundays post from me this week I'm afraid... the past week or so has been far too hectic and I just want to relax :)

This is what my husband and I have been up to:


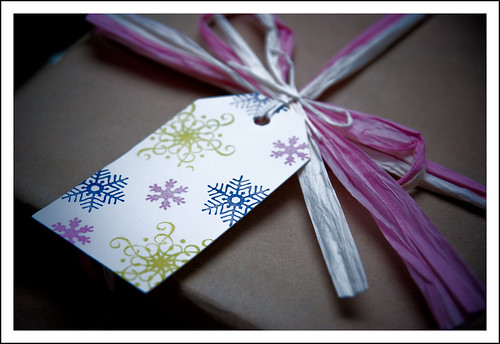
Gift Tag


I made the tags, he wrapped the gifts. It works for us as I'm the sloppiest present-wrapper in existence!

I used Colorbox Queue chalk inks (Christmas) on the tags that we used for our nieces' and nephew's gifts (as above) to make them bright and cheerful. The stamp set I used was "Winter Butterfly" by Hero Arts.

And here's what else we've been doing:


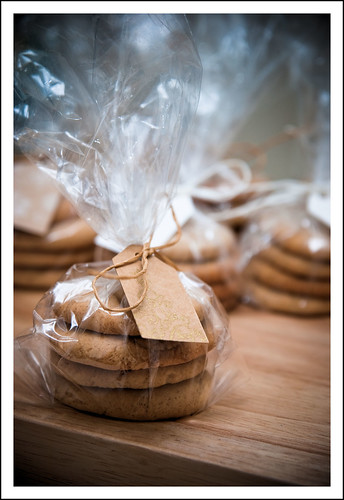
Cookies
Baking! We make these every year - they're Pebber Nodder biscuits, which are Danish apparently, and they are just delightful. Here's a recipe if you want to try them yourself!

Once again, I made the tags, and my husband baked the biscuits. I was in charge of the presentation of these though as I'm the resident 'expert' raffia-bow-tyer! I used Versacolor 'Gold' on these little ones and stamped the top part of a Christmas tree from "Merriest Wishes" by Hero Arts. I find that the Versacolor metallic inks do not dry on most surfaces so I always seal with a matte fixative to stop it from rubbing off all over the place.

My husband took both of the photos above - in case you were wondering why the photos on my blog suddenly looked SO much better and more professional than usual ;)

I'll be back on Boxing Day though, to share next week's Sentimental Sundays challenge with you, I promise! In the meantime, check out the Sentimental Sundays blog to see the beautiful creations the DT has come up with for this week's theme - Inspired by Song - and play along yourself to have a chance to win beautiful Raindrop Echo Design digital stamps!

Merry Christmas everyone - hope Santa brings you everything you asked for ;)


Sunday, December 12, 2010

May Joy Fill Your Home

It's time for another Sentimental Sundays challenge!

This time the challenge is Let it Snow + a sentiment.

Here is my card:


May Joy Fill Your Home (1)


The background is a piece of fabric my MIL gave me the other day that is super sparkly on one side (too sparkly for my needs I'm afraid) but only slightly sparkly on the other. I used the slightly sparkled side, and stamped over it with a Hero Arts snowflake in Cement Versacolor ink.

Here's a bit of a closeup to show some of the sparkle:


May Joy Fill Your Home (2)

I drew over the snowflake in the sentiment with my clear spica pen. I also sponged around the sentiment layer with the Cement Versacolor just to make it stand out a bit.

I am entering this into the Wee Memories CASE Your Favourite challenge for this week - my muse is the ever/uber/amazingly talented Joy Taylor (who for some reason subscribes to this little blog of mine so I hope she reads this and is flattered, not aghast! ;))

I also would like to enter it into the Moxie Fab Glitter is Glam challenge!

So that's it from me, but you can see what the rest of the Sentimental Sundays team have created this week at the Sentimental Sundays challenge blog. You have until next Sunday to submit your entry if you decide to play along, and the random winner will receive four individual sets of digital sentiments from Raindrop Echo Designs Whimsy Stamps Digital Collection, and a custom watermark from the Custom Designs at Whimsy Stamps!

Size of card: C6 (A5 folded)

Supplies:

Card/paper - Canson textured cardstock (white)
Stamp - Season's Greetings Sentiments set from Whimsy Stamps, Hero Arts "Winter's Butterfly" set
Ink - printer, Cement versacolor
Extra - American crafts ribbon, Clear Spica Atyou pen, glitter fabric

Tools - Carl rotary trimmer, Pixma printer, scissors, Helmar glue runner, JAC adhesive sheet, foam dots

Challenge: Moxie Fab World - Glitter is Glam

Thanks for looking, I hope you have a lovely day!

Sunday, December 5, 2010

You make life beautiful

Hello! It's Sunday, so it's time for another Sentimental Sundays challenge!

This time the challenge is Happy Anniversary + a sentiment.

I think my fellow design team members have gone all out for this one - so many lovely creations on one page - check it out (link is in the last paragraph of this entry), you won't be disappointed!

Here's my little card:


10_12_05_annniversary_01w


And here's another angle:


10_12_05_annniversary_02w
Both the sentiment and the background it is printed on are digital. The gorgeous sentiment is one from Raindrop Echo Designs called "Marriage Sentiments".
The background pattern is from a Christmas release from MyGrafico by Jazzy Patterns called "Christmas Time". It's such a beautiful pack - lots of damask (you know how I love damask!) and in sort-of-traditional Christmas colours - perfect for non-Christmas cards!

So that's it from me, but you can see what the rest of the Sentimental Sundays team have created this week at the Sentimental Sundays challenge blog. You have until next Sunday to submit your entry if you decide to play along, and the random winner will receive four individual sets of digital sentiments from Raindrop Echo Designs Whimsy Stamps Digital Collection, and a custom watermark from the Custom Designs at Whimsy Stamps!

Size of card: 4" square

Supplies:

Card/paper - Canson textured cardstock (white), Kodak matte photo paper
Stamp - Marriage Sentiments set from Whimsy Stamps, Christmas Time by Jazzy Patterns on MyGrafico
 Ink - printer

Extra - Natural coloured crochet yarn, Twill
 Tools - Carl rotary trimmer, Pixma printer, scissors, Helmar glue runner


Thanks for looking, I hope everyone has a lovely day!

Saturday, December 4, 2010

Home Sweet Home

This was a slightly belated housewarming card for a former colleague who recently bought a house.


homesweethome_02


Here's a slightly different angle:


homesweethome_01

The sentiment was released this weekend at Squigglefly [click here to get it!]

I think I unconsciously used Clean and Simple's sketch 108 (sort of) for this card, but I only realised it because I happened to glance at the handy PDF of sketches 96-108 I have pinned up on my bulletin board today. Weird! Great sketch though ;)

I used versamark to stamp the houses (one stamp, repeated). I've found that if you want a darker impression just press the stamp down for longer. I'm not sure whether I've shared this tip before, so if I have my apologies. :)

Size of card: approx 4" round(ish)

Supplies:
Card/paper - Quill white cardstock, Matte photo paper, Utopia collection by Kaisercraft, Cre8tive textured cardstock

Stamps - "Home Sweet Home" from Squigglefly (by me!), Inque Boutique "Memoirs"
Ink - Versamark
Tools - Carl rotary trimmer, Pixma printer, Bigshot, Big Scallop nestabilities, Circle nestabilities


And I just thought I'd share another picture of my girl Abby - this time showing where she likes to sleep while I craft.


Abby


I swear she has that 'oh you've just gotten up so you're going to feed me' look on her face that she wears so often ;)

Thanks for visiting and I hope you have a lovely day!

Sunday, November 28, 2010

Merry Christmas from our home to yours

It's time for another Sentimental Sundays challenge! This time we're challenging you to follow a recipe:


3 DP, 3 buttons, ribbon


It's not for the faint of heart if you're a CAS gal like me, but I think what I came up with is relatively CAS:


Merry Christmas from our home to yours

I got out my Christmas Carnival 6x6 pad by Kaisercraft and punched out squares from several different pages before deciding upon the three I used. I adhered some ribbon on them and then stuck down the buttons already tied with Copic-dyed sewing thread. I ran the card through my printer using Word to get the sentiment right where I wanted it after colouring it pink using Paint Shop Pro to match the Christmas Carnival paper.

The sentiment is from the "Christmas Sentiments" set by Raindrop Echo Designs at Whimsy Stamps which will be released December 1st.

So that's it from me, but you can see how the rest of the Sentimental Sundays team have followed the recipe at the Sentimental Sundays challenge blog. You have until next Sunday to submit your entry if you decide to play along, and the random winner will receive four individual sets of digital sentiments from Raindrop Echo Designs Whimsy Stamps Digital Collection, and a custom watermark from the Custom Designs at Whimsy Stamps!

Size of card: 10cm x 15cm (6" x 4")

Supplies:

Card/paper - Quill white cardstock, Christmas Carnival collection from Kaisercraft - 6x6 pad
Stamp - Christmas Sentiments set from Whimsy Stamps (will be released December 1st!)
Ink - printer 

Extra - ribbon, sewing thread, Copics (Cool Shadow, Pale Pink, Pale Cobolt Green)
Tools - Carl rotary trimmer, Pixma printer, Sullivan's punch, Papercraft adhesive tape, foam dots

Thanks so much for looking, hope you have a lovely day!

Welcome Little One

I just love this sketch from Clean and Simple! Here's another card I have made using it:


Welcome Little One (1)


Here's a slightly different angle:


Welcome Little One (2)

The sentiment was released last weekend at Squigglefly [click here to get it!], and the little rattle is from the Baby Stamps set by Tainted Sweets on MyGrafico - love that set!

Size of card: 4" square

Supplies:
Card/paper - Quill white cardstock, Matte photo paper, Inque Boutique 'Isn't it Romantic' 6x6 pad

Stamps - Welcome little one from Squigglefly (by me!), Baby Stamps by Tainted Sweets
Ink - printer 

Extra - Prismacolor pencils, Kaisercraft grosgrain ribbon
Tools - Carl rotary trimmer, Pixma printer, EK Success large corner rounder, Papercraft adhesive tape, foam dots, Bigshot, Big Scallop nestabilities, Carl 1 1/4 inch round punch

Thanks so much for looking, hope you have a lovely day!

Sunday, November 21, 2010

Thank you from the bottom of my heart

Hi everyone! I've got another Sentimental Sundays challenge for you today - this week's theme is 'Thoroughly Thankful' which can be for Thanksgiving or just to say thanks - it's your choice. Being that we don't celebrate Thanksgiving here in Australia I went with 'Thanks'!


Thankyou from the bottom of my heart


I used the Gratitude digital sentiments set from Whimsy Stamps, and broke out my brand new Ranger ink blending tool to go around the edges with Old Paper distress ink. That tool is just so cool - if you've never used it, seriously, put down that makeup sponge and go buy one, you won't regret it! Because of my newfound love I think there's going to be a lot more distressing from me in the future :)

Just in case you want to know, here's the link to a previous post where I explained how I construct these 'window' type cards with my nestabilities. The only difference with this card was that I didn't pop the upper layer up with any foam dots. This way it'll be good to go in the mail!

So that's it from me, but you can see what the rest of the Sentimental Sundays team have created this week at the Sentimental Sundays challenge blog. You have until next Sunday to submit your entry if you decide to play along, and the random winner will receive four individual sets of digital sentiments from Raindrop Echo Designs Whimsy Stamps Digital Collection, and a custom watermark from the Custom Designs at Whimsy Stamps!

Size of card: 10cm x 15cm (6" x 4")

Supplies:
Card/paper - Recycled cardstock, Devonshire collection from Kaisercraft - Clarabelle
Stamp - Gratitude Sentiments set from Whimsy Stamps
Ink - Old Paper distress ink, printer
Tools - Carl rotary trimmer, Pixma printer, Ranger ink blending tool, Nestabilities labels 8, Bigshot


Thanks so much for looking, hope you have a lovely day!

Monday, November 15, 2010

Merriest Wishes

Hello again! Hope everyone enjoyed their weekend :) Bet nobody expected a post from me on a Monday of all days hey?

This is my entry into this week's Wee Memories' Dust off that patterned paper challenge. I wonder if my entry still counts - since my patterned paper collection is quite well-used. hmm..:) Anyway here it is:


Merriest Wishes


I used paper from the 'Countdown' collection by Kaisercraft - this one is 'Tinsel'. The sentiment is from the 'Merriest Wishes' set by Hero Arts from last year. An oldie but a goodie!

I think this would be an easy one to reproduce - the only fiddly thing is the ribbon! :)

Size of card: 4" square

Supplies:
Card/paper - Cre8tive textured cardstock, 'Tinsel' by Kaisercraft
Stamp - 'Merriest Wishes' by Hero Arts
Ink - Versamagic Cloud White
Extra - Hat Box ribbon
Tools - Carl rotary trimmer, foam dotsscissors


Thanks for looking!

Sunday, November 14, 2010

Merry Christmas

Just a quick little post to share these tags I've made to put up for sale in my Madeit shop:


Merry Christmas - tags


I used my own sentiment (available at Squigglefly here!) and three of the snowflakes from this set by Lil Ellaboudy design at MyGrafico.

The twine is from Jay Gee's Nook that I will probably regret only getting small amounts of ;) The colours I've used are Peapod (green and white), Maraschino (red and white) and Caribbean (teal and white).

I've left them blank on the other side for the message as sometimes I think 'To' and 'From' is a little bit limiting, don't you think?

Thanks for looking! :)

Sunday, November 7, 2010

Sent with much love

I'm back to share another challenge from Sentimental Sundays. This week's challenge is a sketch!
So here's the sketch (by lovely teamster Dorcas):


And here is my interpretation:


Sent with much love (1)


Here's a close-up of the flower:


Sent with much love (2)

This card started out so different to what it ended up being! I originally had it as a C6 card (A5 folded in half), then shortened it until it was some weird size that would have been difficult to find an envelope for, and then finally gave up to the inevitable and made it the usual 4" square.

I needed something on the flower (made by cutting notches into big scalloped nestabilities) to match the strip of fabric tape (given to me in a swap by the lovely and super-talented Karen Baker!) and thought thread would be the answer, but I didn't have any of the right colour. So I ran some ordinary white sewing cotton along my Peach copic marker which matched the colour of the fabric tape exactly!

So that's it from me, but you can see what the rest of the Sentimental Sundays team have created this week at the Sentimental Sundays challenge blog. You have until next Sunday to submit your entry, and the random winner will receive four individual sets of digital sentiments from Raindrop Echo Designs Whimsy Stamps Digital Collection, and a custom watermark from the Custom Designs at Whimsy Stamps!

Size of card: 4" square

Supplies:
Card/paper - Bazzill cardstock, Kodak matte photo card
Stamp - Love You Sayings set from Whimsy Stamps
Ink - printer
Extra - button, sewing thread, Peach copic marker, fabric tape
Tools - Carl rotary trimmer, Helmar glue runner, foam dots, Pixma printer, Bigshot, Big scalloped circle nestabilities


Thanks so much for looking, have a lovely day!

Friday, November 5, 2010

Sweet wonderful you + free sentiment

Hallelujah, it's the weekend!

When I saw the below picture from Jay Gee's Nook's Monthly Challenge:


I was immediately drawn to the wrapping paper on the left. It reminded me of damask which made me think of the latest challenge at Moxie's Fab World - Diggin' On Damask. I was so inspired I had to blend the two challenges!

Wee Memories are hosting an 'Anything Goes' challenge, so I'm going to sneak this into that as well ;)

Here is my card:


Sweet Wonderful You


I can't stamp damask patterns (or anything that's supposed to line up really, even clear stamps!) to save my life, so I quit while I was ahead and created the pattern digitally. I used one of the stamps from a lovely Mujka Chic set I bought on sale a while ago called Decorative Design Elements.

I tried something different with the ribbon for this card - I burnt the ends using a small tealight candle, which is how I stop my bookmark ribbons from fraying as well. It sure beats wrapping it around the card!

It was easy for me to change the colour of one of the words in this sentiment because I had the 'raw' file to work with, but there's nothing stopping you from changing the colours of the sentiments you have in .png format. Just use the 'Flood fill' option in your picture editing software (I think most have some form of this - it usually looks like a paint can) and coat each letter with the colour of your choice.

And here's the free sentiment I promised in the title of this post:


Right click on the above image and select the 'Save target as...' option.


Sentiment info:
File type: PNG (can be dropped into MS Word, background is transparent)
File size: 66.2kb
Full dimensions: 22cm x 4cm
Font: LD Cotton Candy, Vrinda


See my terms of use here.

Size of card: A5 folded in half (C6)

Supplies:
Card/paper - Quill white cardstock, Epson matte photo paper
Stamps - Decorative Design Elements by Mujka Chic on MyGrafico, Sentiment - freebie from me (see above!)
Ink - Printer
Extra - American Crafts ribbon
Tools - Carl rotary trimmer, Helmar glue runner, Pixma printer, fabric scissors, tealight candle

Challenges: Diggin' On Damask / Jay Gee's Nook's Monthly Challenge / Wee Memories Anything Goes!


And before I go, I just thought I'd share a picture of my darling girl Abby that mysteriously found its way into my blog photos folder:


That's where she hangs out almost every night - behind me in my craft room, hoping I'll get up and feed her some more food!
 
Well I might go and give her a cuddle - I'll be back on Sunday with next week's Sentimental Sundays challenge!

Sunday, October 31, 2010

Just for you

How exciting! This is my first post as part of the Sentimental Sundays design team. This week's theme is Birthdays, and I have a card to show you that would be a great birthday card for a guy!


I used the 'Just for you' sentiment from the Garden Bun Bun Fairy digital set by Raindrop Echo Designs which is available at Whimsy Stamps.

I paired it with patterned paper by my favourite company - Kaisercraft - from my rather large stash that I should use far more often than I do. The collection of papers is 'Thrill Seeker' and the paper I used is 'Discover'. The whole collection of papers are available from Scrapping Essentials at half price!

I'm sharing a picture of how I construct these cards so that you don't think I print directly onto the card front... how fiddly would that be? I cheat! See the picture below for the evidence of my crime:

(sorry about the PJs but this is how I do my best work ;))

So as you can hopefully see, I have my card front (blank), the sentiment printed and cut out just larger than the circle (I print a bunch off at once to save time and paper and I have a little file I keep my cutouts in to use later). I die cut the circle using my bigshot and nestabilities, and wrapped some natural raffia on the left hand side to give the card some interest.
To line everything up when adhering I cover the back of the top layer with foam dots (I cut mine in half to save using so many) including quite close to the circle to prop it up nicely. I stick the sentiment on first and adjust it so that it's centred under the circle (trimming off any excess from the sentiment layer that pokes out the sides) and  then stick the whole thing down to the cardfront.

Hope that made enough sense! I should have taken some photos of other steps in the process so that you don't have to rely on my below-par explanations! Just let me know if you have any questions?

Don't forget to check out what the rest of the Sentimental Sunday design team have been up to!

Size of card: 4" square

Supplies:
Card/paper - Quill white cardstock, Recycled brown cardstock, 'Discover' from the Thrill Seeker collection by Kaisercraft
Stamp - Garden Bun Bun Fairy set from Whimsy Stamps
Ink - printer
Extra - Natural raffia from bargain shop
Tools - Carl rotary trimmer, Helmar glue runner, foam dots, Pixma printer, Bigshot, Circle nestability

Take care! 

Friday, October 29, 2010

Happy Birthday

MyGrafico challenge #72 wants everyone to add some sparkle - so I did!


Happy Birthday (1)


The sparkle is actually not at all noticeable in the above photo, so how about another one?


Happy Birthday (2)

Can you see it? The flower on the bottom left corner shows it the best. I love the subtleness of the spica atyou pen, but hate the unphotogenic-ness of it. This was the best photo of the sparkle I took... the hit and miss method I used was constantly tilting and angling it around, trying to find the sparkle and taking a shot every now and then. I used naked light [a cool daylight energy saver bulb from my lamp], don't try doing it from inside a light tent - trust me, it's a lesson in futility!
The flowers are my old favourites from MyGrafico - from the Contemporary Design Elements set by Mujka Chic. I didn't use a proper sentiment on this one - it's just printed directly from typing it out in word.

I coloured the flowers using my Prismacolor pencils as well as a blending stump dipped in baby oil. I've just recently bought some Zest-it which is an actual artist's blending solvent made from oranges (I think!) that isn't toxic and has a nice citrusy odour - it blends SO much better than the baby oil - I'll show a card that I've used it on soon!

Size of card: 4" square

Supplies:
Card/paper - Quill white cardstock
Stamp - Contemporary Design Elements from Mujka Chic (MyGrafico)
Ink - printer
Extra - Prismacolor pencils in Lilac and Lavender, blending stump, baby oil
Tools - Carl rotary trimmer, Helmar glue runner, scissors, Pixma printer

Challenge: MyGrafico #72


Thanks for looking, and I hope everyone enjoys their weekend!

Tuesday, October 26, 2010

Squigglefly Sentiments

Just a little post to show off the Squigglefly design teams creations using my sentiments!


Jane from Millie's Marvels used one of this week's new releases - 'Tis the Season on this card. I just love that cute little Santa she paired it with! Click on the image to see the blog post.

And Holly from Hogs Wild About Stamping used the Birthday Wishes sentiment from a previous release for the below card:


Isn't that a creative way of framing the flower? I'll have to try that for myself sometime! Click on the image above to see the blog post.

Well that's it from me tonight - I have to stop procrastinating and get on with some projects!

:)

Monday, October 25, 2010

Exciting news!

I've been holding onto this piece of news for a couple of days but now I'm going to just blurt it out because I can't hold it in much longer!


I've been chosen to be one of the new Design Team members for Sentimental Sundays! You all know how much I love my sentiments, and it's great because the team comprises of such a lovely group of ladies.

So you can expect to see more sentimentality on this blog in the future! (Bad joke, I know!)

Bye for now!

Sunday, October 24, 2010

Wee Memories Scrappy Saturday Challenge - giveaway!

Wee Memories - one of my favourite challenge blogs - is giving away some awesome stuff! Click on the button below to get the details:


Happy Sunday everyone! I will be back with some exciting news of my own to share very soon!! :)

Saturday, October 23, 2010

Have a Hoppy Day + free sentiment!

I just love this week's sketch from Clean and Simple! Here's another card I have made using it:


Have a Hoppy Day (1)


Here's a slightly different angle:


Have a Hoppy Day (2)
How adorable is that little frog? He's from Pink Cat Studios (as is the little owl from yesterday's post).

And because I know how much everyone loves freebies, I'm going to add the sentiment used on this card to my growing pile of them! :)

Right click on the below image and select 'save target as...'.


Sentiment info:
File type: PNG (can be dropped into MS Word, background is transparent)
File size: 66.2kb
Full dimensions: 22cm x 4cm
Font: LD Cotton Candy, Vrinda


Enjoy!! Don't forget to give credit where it is due, and let me know when you use it so that I can take a look!

Size of card: 4" square

Supplies:
Card/paper - Quill white cardstock, Textured cardstock, Kodak photo card,
Stamps - Frog from Pink Cat Studios, Sentiment - freebie from me (see above!)
Ink - Printer
 Extra - satin ribbon, Prismacolor pencils
Tools - Carl rotary trimmer, Helmar glue runner, Big Shot, Big Scallops nestability, Pixma printer, fabric scissors, EK Success large corner rounder, Foam dots (to pop up scallop layer), Carl 1 1/4" circle punch

Thursday, October 21, 2010

Congradulations + sneak peek!

Happy Thursday! I'm happy because I'm having a long weekend (Friday - Monday) so I can stay up late tonight and create!


Congradulations (1)


Congradulations (2)
The sentiment I used for this card is one I have had in my head for a while but I didn't have anything to pair it with until I found this cute little graduating owl at Pink Cat Studios last weekend. I found him so easy to colour (especially at the size he is - small enough to fit comfortably inside a 1 1/4 inch circle punch!)

I couldn't resist some more word-play which I just love to do, and if you like the sentiment you will be able to purchase it from Squigglefly this coming Saturday.
Edited to add: It's now available on Squigglefly - Click here to download.

I followed the Clean and Simple sketch for this week, and I love it so much I have many, many more cards planned out in my head inspired by it! I'll show you another one I've made tomorrow.

I'm also entering this one into this week's Wee Memories Scrappy Saturday Challenge which is all about celebrating - and graduation is definitely something that is celebrated!

Size of card: 4" square

Supplies:
Card/paper - Quill white cardstock, Textured cardstock, Kodak photo card,
Stamps - Owl Graduate, Congradulations from Squigglefly (by me!)
Ink - Printer
Extra - Christina Re satin ribbon, Prismacolor pencils
Tools - Carl rotary trimmer, Helmar glue runner, Big Shot, Big Scallops nestability, Pixma printer, fabric scissors, EK Success large corner rounder, Foam dots (to pop up scallop layer), Carl 1 1/4" circle punch


Thanks so much for taking a peek - catch you again soon!